Some of you may have seen that the store went on vacation earlier this week. I'll be coming back to Washington around the 9th of January. For now I'll enjoy my trip to the parents and get pampered in every way. Especially since I caught a cold on the flight over, I'm getting the full works of pampering right now. It sure makes having a cold less horrible.
After getting fully rested and enjoying the holidays, I hope to use the 3hr time zone difference to help me wake up earlier in WA. If I can get used to waking up at 8am in NY which is 5am in WA then I can finally start taking more High school Substitute placements! Yay. Although I like the elementary kids more these days, it's nice to not be around complete children all the time. I'll be subbing as much as I can when I get back(so I can get to the point of a pay raise yay) so commissioned work may be slower, but I still plan to plush as much as I can on days off. That and theres this week off in February for "2nd winter break?/1st spring break" i think they officially call it spring break, but they have another spring break in april, and well february is still winter isn't it? I dunno, but I plan to get lots of plushies done and start posting more on here.
I have a lot of projects I started or thought of that I need to finish and get out there. So hopefully the new yr will be a good one, and I can get lots of things done while still making some good money for the future house i want one day XD
I hope everyone has a lovely holiday!!!! and sorry for any typos, I'm a bit too sick to reread right now XD

Hi I'm the plush maker behind Cute Stuffies, an online store on etsy that features adorable cute soft plushies: Http://neoitvaluocsol.etsy.com
Friday, December 16, 2011
Tuesday, December 6, 2011
Plopling Love Story
This is the story I wrote awhile ago,but never got around to posting XD of the adult ploplings and how they fell in love.
On Plopper Ave, lived two lovely Plopling Familys, one of which had two righty parents and a lefty child named Ploplin. The other had two Lefty parents and a righty child named Plopchen. Ploplin was a handsome yellow Plopling with a big bulge at the end of its swirl. At school Ploplin was friends with everyone, especially the other lefties. Plopchen, on the other hand, was an average looking blue Plopling with a skinny swirl. Plopchen often saw its neighbor with envy and wished it was as attractive and good looking as Ploplin. Plopchen often wished it had a popular plump bulging swirl too.
Although jealous of Ploplin, Plopchen was actually close friends with Ploplin. Growing up as neighbors they had shared many memories together. They were the closest of friends and that in many ways made Plopchen care less about its scrawny swirl.
Every year on Lovers day Ploplin would get lots of chocolates and requests to be mates This would often make Plopchen very jealous. At first Plopchen thought it was a jealousy of Ploplin's popularity, but one day Plopchen realized that it was jealous because it liked Ploplin. Plopchen wished that it too could give Ploplin chocolates, but the union of lefties with righties was forbidden in the land of Ploplings.
For years Plopchen kept these romantic thoughts to itself, only to yearn more and more to be with Ploplin, and getting jealous of every lefty who got close to Ploplin. Then, one day Plopchen decided to risk it all and tell Ploplin the truth. Ploplin was overwhelmed with excitement at the news, because Ploplin had also always had an eye for Plopchen. Ploplin wished always to be with Plopchen, but knew it was forbidden and tried its best to ignore those desires. Now that it was known they both loved eachother, it was impossible for them to resist being together.
Plopchen and Ploplin decided to secretly date. For months they were the happiest Ploplings in all the land. They spent so much lovely time together just enjoying who they are and how they made eachother feel. Then one day one of Ploplin's parents found them together. The parent was very upset with both of them and immediately involved all the parents.
Ploplin and Plopchen explained their hearts out about how much they loved eachother and how they didn't care that Ploplin was a lefty or Plopchen was a righty, that love meant more than direction.
Although the parents hesitated at first, it became obvious to all of them that their children were truly in love. They had concerns of how this would effect their futures, but decided to support them and their abnormal relationship.
Ploplin and Plopchen dealt with various hardships in their life because of their unusual relationship between Ploplings of opposite swirls, but they knew they could deal with anything as long as they had eachother. They lived happily ever after raising a lovely family of their own on Plopper Ave.
The End
Tuesday, October 11, 2011
Life Update
I'm very excited!!! My quest to become a substitute has been horribly long and tricky. I'm not sure why this state makes it so difficult(especially when I'm already a certified NY teacher), but alas I am officially a substitute!!! I have my first sub position on thursday! Best part is it's only a half day so I don't need to wake up at like 5 or 6 am. I'm so excited, I think subbing will be interesting as I will always have new classrooms, with new students, new subjects, and new schools with different coworkers and administration!
Unfortunately I will be making less cute stuffies as I'll have less time, but I'll do my best to create cute guys on the weekends and the days I have off.
Unfortunately I will be making less cute stuffies as I'll have less time, but I'll do my best to create cute guys on the weekends and the days I have off.
Saturday, October 1, 2011
October Coupon Code!
Well it has been awhile since I had a sale, and I figure October is the 10th month, so let's do a 10% off Sale!! So Everything in my store is 10% off with the coupon code: OCTOBER
How to use the coupon code? After you add an item to your cart, and you view cart, there will be a blue link that says "Apply shop coupon code" click the link, and a space to enter the code should appear, and type in OCTOBER and you'll get your 10% off!!
The coupon code will deactivate on November 1.
Wednesday, September 28, 2011
The Plopling Family!
So the babies from before ended up bigger than I meant, so I decided they are just children, and made new babies! And now I have a family of cute adorable Ploplings with 2 kids and 2 babies:

Available at my store: http://neoitvaluocsol.etsy.com
They are absolutely adorable together! The little babies are super tiny and squishy, I just love them... which is probably why I decided to keep the originals and have them made to order. hehehe... soon my house will be overrun with cuteness ^___^
So little Baby Ploplings despite their cuteness and age are very mischievous and smart. The story I will write with them will have to do with naughty activities of them trolling people. The children Ploplings will have a story about the values of education. Being an educator myself, I feel a need to have one tale about the benefits of being educated. I have already written a story for the adult Ploplings, it is a tale about how they fell in love and made this lovely family of rainbow cuteness hehe.
I'm so excited just thinking up the Plopling world and creating these creatures, but I'm beginning to realize that them not having gender makes it hard to write about them. I never realized how hard it is to write a story without he-she her-him pronouns. I want to use "it", but "it" isn't very descriptive, so I'll have to think about it. I guess I could name them righties or lefties, but I accidentally got carried away when making them and made all the children righties XD
Monday, September 26, 2011
Ploplings!!
Ploplings are invading my mind!!! They're all I seem to want to make lately! What is a plopling, well a picture is worth a thousand words:
 The Blue one is known as Plopchen and the yellow Ploplin. They are inlove.
Ploplings come in all sorts of colors, and when I put them on my store they will be made to order(since the original two are inspiring some fun stories I may need them for photos). Ploplings are genderless critters identified by the spiral on their head(known as a swirl) and stubby arms. Their age is seen through the length of the swirl. Therefore Baby Ploplings will have short swirls, and will look sorta like this:

The direction of their swirl usually determines which Ploplings they will mingle/flirt/and mate with. The size and shapes of their swirls are seen as unique differences, such as a humans hair color, shape, body type, etc, but the Primary types of swirls are ones with a bulge at the tip and those without.
I plan to write little stories to go with the Ploplings I make. Not sure yet how I want to do it. I almost want it to be a kinda picture book kids story with real themes, using the plushies for the pictures. If you have any ideas I'd love to hear them!
Sunday, September 25, 2011
And the finished results...
So here is the final result of the zombie bunny!!! I took a picture of it int he sun light so it has some eerie shadows going on:

Here is it with normal lighting front and back:


I'm pretty happy with how it came out, the greatness of it is purely in the sewn on details. The drop of blood from the mouth, the red/yellow eyes, they're what make it a true Zombie bunny. That and I guess green fur XD
I also finished the Pink Bunny Fox! She looks really cute with the orange one(look they're holding hands!):

They're for sale: http://www.etsy.com/listing/80022186/bunny-fox-plush
So that is what I was working on, but NOW I have a new fascination, I'll probably blog about it tomorrow cause I want it to stand alone, but consider this a sneak peak:
Ploplings! They're cute plump critters with stubby arms and a spiral appendage on their head. The designs at first were cool and exciting to make, but now that I've sewn them they've been opening up tons of creativity! I want to make stories to go along with them, and I have a whole bunch of Plopling History! So I have a feeling October will be full of lots of posts about Ploplings!
Thursday, September 22, 2011
Halloween Fun and bringing back the old!
I got a new custom order yesterday! Part of the order is for similar plush to what I am already selling with some modifications(different colors, larger sizes, etc). But another part is the awesome idea of the ZOMBIE BUNNY! With Halloween coming in about a month, I got very excited for this, so I started it right away. I'm quite proud of the design for the zombie bunny, here is my progress thus far:

I also plan to add some black stitch marks to make it look like some pieces were once removed but stitched back on. All in all I'm very excited to see the end product!
I'll be working on that the next couple of days. In addition to that I'm bringing back a lot of my past designs that have already sold. But often I don't like making the exact same thing so for some of them I am adding a twist or changing colors or whatever. One of those is my new jack o lantern Hot cocoa mug with ghost marshmallow.
 For Sale:Click Here
The original was just a white mug with normal marshmallow, but one day I was feeling festive and so it started as an orange mug with green handle, then I realized it'd be cool to add the jack o lantern face, then I was talking to my friend and she's like "make a ghostmallow!" and so it was done! The ghost came out super cute too, best suggestion ever.
I'll also be making a red and blue mug, and if they don't sell in a couple months I'll probably add some X-mas decorations and make them winter themed :D
In addition to that I've been working on a Mr. and Mrs. Bunny Fox. The Mr will look the same, but the Mrs. will be hot pink. We'll see how those turn out!

I also plan to add some black stitch marks to make it look like some pieces were once removed but stitched back on. All in all I'm very excited to see the end product!
I'll be working on that the next couple of days. In addition to that I'm bringing back a lot of my past designs that have already sold. But often I don't like making the exact same thing so for some of them I am adding a twist or changing colors or whatever. One of those is my new jack o lantern Hot cocoa mug with ghost marshmallow.

The original was just a white mug with normal marshmallow, but one day I was feeling festive and so it started as an orange mug with green handle, then I realized it'd be cool to add the jack o lantern face, then I was talking to my friend and she's like "make a ghostmallow!" and so it was done! The ghost came out super cute too, best suggestion ever.
I'll also be making a red and blue mug, and if they don't sell in a couple months I'll probably add some X-mas decorations and make them winter themed :D
In addition to that I've been working on a Mr. and Mrs. Bunny Fox. The Mr will look the same, but the Mrs. will be hot pink. We'll see how those turn out!
Monday, September 19, 2011
Plushing your own designs
Time for more beginner plush advice! This time on making your own patterns!
So as some or all of you may know I don't use other people's patterns. The general process I go about making plush patterns consists of these steps:
-Sit on the couch with a pad of paper and make little cute doodles of possible plush.
-pick my fav doodles and make a larger doodle of the size it will actually be on a separate piece of paper
-Cut out the shape and start plushing!
More complicated patterns may contain more steps... but thats the general idea... think of what you want to plush, and then think of all the shapes you'll need.
But it can't be that easy right? Well I think it is this easy since I've been sewing since a kid and I've had a seamstress job and such, as well as i've been making plush now for 9months, but what do you do if you're a beginner?
My suggestion is start with some basic shapes first(circle, triangle, square, etc) and definitely start with 2d plush(notice I said circle, triangle, square as opposed to sphere, pyramid, or cube). As you get used to making these basics and get the hang of how basic shapes work, start making your own shapes.
Take this elephant:

It started by this basic shape of a cookie cutter I found(Or I could have made a similar doodle):

I then transformed that basic shape to this:

I used that paper cut out pattern to cut out the body for the elephant. Yes in this case I needed to add ears and tail and eyes, but the primary shape was that simple.
After you get used to this 2d pattern making you actually have the skills to make A LOT of plush now! You will also be able to move onto basic 3d shapes like cubes, cylinders, and spheres- you can find patterns for these shapes online, and I would start with their patterns unless you have good geometry sense, if you work with these shapes, you will get more familiar with making certain other similar shapes.
Thursday, September 15, 2011
Tuesday, September 13, 2011
Weee so busy!
I've been busy working on these sweet little things:

They're a custom order I got, apparently they are from an xbox 360 game called Ilomilo, by the same people who made Little Big Planet. They took a decent amount of time and work to make. The hardest part was definitely that antenna, and I hope the postoffice isn't too rough with the package, since they're somewhat fragile.
I made a pattern for it and it's for sale on my etsy:
I've also been working on some x-mas designs and some new hybrid animals. The bumble fish came out really wonderful! It's so cute i'm not sure I can part with it...

It's funny because it came out nothing like my design. Originally he should have been round like a bumble bee... but I must have been distracted when I cut the fabric, because he came out so long and narrow. But I like that he came out this way, he looks more like a fish!
And now for a sewing tip.
One of the most wonderful ideas I had was to keep all sorts of scraps. I call it my scrap bin, but really it's just a drawer. As long as a scrap of fabric is bigger than a dime I pretty much save it, especially if it is black, pink, white or yellow. When I watch movies/tv with my hubby, I often times cut these scraps(especially the colors I mentioned before) into useful shapes, like round eyes, oval eyes, blush marks, noses, hearts, etc~ these would be what those plastic containers are for. I put all the cut shapes into the plastic containers so I can find them later. I feel like having a bunch of eyes pre-cut, and blush marks, noses, etc helps to keep the flow when I'm sewing on a machine. It also keep my work place cleaner since I cut elsewhere. Also if I cut a bunch at the same time, I get in a rhythm and can cut them better and faster. That and using scraps for this type of thing saves on fabric! So if you plan on making lots of plushies for a long time, you should have a scrap bin!
Friday, August 26, 2011
What I've been up to
Excuses for my lack of blogging XD. I've been working on patterns that I will sell in my store. So on this blog I will mostly give sewing tips, but some of my plushies I'll have detailed patterns for sale with shapes to use for cutting the fabric and step by step instructions. So if you're interested in making your own plushies and like any of my patterns you should keep an eye out at my store. Also if you have any pattern requests of plushies I have already done, which you'd like to see appear in my store, let me know. A mostly full collection of all my plush work is at my deviant: http://neoitvaluocsol.deviantart.com
Speaking of Deviant Art and patterns, my Chubby star giveaway is coming to an end. So far I have nearly 70 people that signed up for this cute Chubby star:
 I got about 250 points too! So my premium membership is on it's way. If you're a member of deviant art and havn't entered, you have till the 31st of august to enter or donate points. If you don't feel like signing up but still want this little dude, the pattern for making him is for sale in my store :D
In terms of current projects I've been in holiday mode. I have been working on some halloween themed plush. Got my little ghosty done:
Now I'm working on some bunny Batties(half bunny half bat) I'm really enjoying the hybrid animals I produce... I have an idea called the Bumble Fish(half fish half bumble bee)... so we'll see how those all turn out XD I also have some X-mas ideas. I figure since X-mas is one of the biggest times of the yr for sales I can't start too soon on making things for it. So keep an eye out for my new stuff ^_^
I'll try to blog about one of my new projects next time :D
Speaking of Deviant Art and patterns, my Chubby star giveaway is coming to an end. So far I have nearly 70 people that signed up for this cute Chubby star:

In terms of current projects I've been in holiday mode. I have been working on some halloween themed plush. Got my little ghosty done:

Now I'm working on some bunny Batties(half bunny half bat) I'm really enjoying the hybrid animals I produce... I have an idea called the Bumble Fish(half fish half bumble bee)... so we'll see how those all turn out XD I also have some X-mas ideas. I figure since X-mas is one of the biggest times of the yr for sales I can't start too soon on making things for it. So keep an eye out for my new stuff ^_^
I'll try to blog about one of my new projects next time :D
Thursday, July 28, 2011
IPhone Plush part 2
| Alright so I left off with all my apps ready to be sewn onto the black fabric which will become the phone. And thats exactly what I did. This was actually really really hard! I had to be as precise as possible and try to keep all the apps as square as possible. Fleece can be stretchy, in some cases that was helpful and in other cases it was very irritating XD. I also added some other details (reception bar(triangle), battery, time, the little bottom button, and the apple logo on the back. So now all I have are two black rectangles of fabric with details on them. I face the black fabrics together so the details are touching(in the inside) and sew the black peices together, leaving a hole at the bottom. |  |
Whenever I sew something with corners I like to snip the fabric to help it bend:

After that, I inside out the plushie through the hole I left. The plushie will look different like this than when it's stuffed, so unless you see some major problems with it, don't do any alterations or changes until after you stuff it. Often when stuffing I push the stuffing into the corners first, and then I fill from the farther parts toward the "stuffing" hole. I fill it till it seems the right amount of stuffing and then I massage the plush until it has the right shape. If it seems really lopsided or just has some problem areas that don't look right, unstuff the plush, and inside out it again and fix the areas that need fixing. Repeat the process till you have it right. Don't be afraid to unstitch some areas and redo them completely if need be. Also ignore all the stray polyfil that by now you've probably covered the plush with(I know I did and it shows so much on black XD ), you want to complete the design and stitch up the whole before you start cleaning that off.
| I'm happy with how it looks so I'm going to stitch the hole. Honestly I have no idea if there is some special name for this stitch(there probably is) but since a lot of my sewing is self discovered, I just think of it as the invisible stitch. My invisible stitch is my preferred way to fill holes,but depending on the plush other ways can be better. As you can see in the picture to the right the hole has fabric that is folded inward. It is important to have your fabric doing this. I then check if I can pinch the fabric shut in a straight line. If not I adjust the folds till it is straight. Then I get my needle and thread and I start with the needle coming from the inside of the plush(to hide the thread's knot inside the plush) and I stitch like shown in the picture. I take a little from one side and then I weave to the other side and repeat until the whole is shut. I then weave my way back to start to better ensure that the stitching will not come apart. |  |
Finally I clean off all the little polyfil strands and there you have it, an Iphone Plush!

Monday, July 25, 2011
IPhone Plush part 1
| So it's about time I use this blog to share some sewing tips! :D Today I'd like to share my latest project that I am working on: IPhone Plush!! The idea is not my own, a friend of mine actually made the custom order a couple days ago, giving me this picture of his iphone screen(to help me out with the apps since I have an andriod 4G evo phone). He wants the plush to be about twice as big and without the mario background. And so with this custom order the challenge arises to make the iphone plush! | 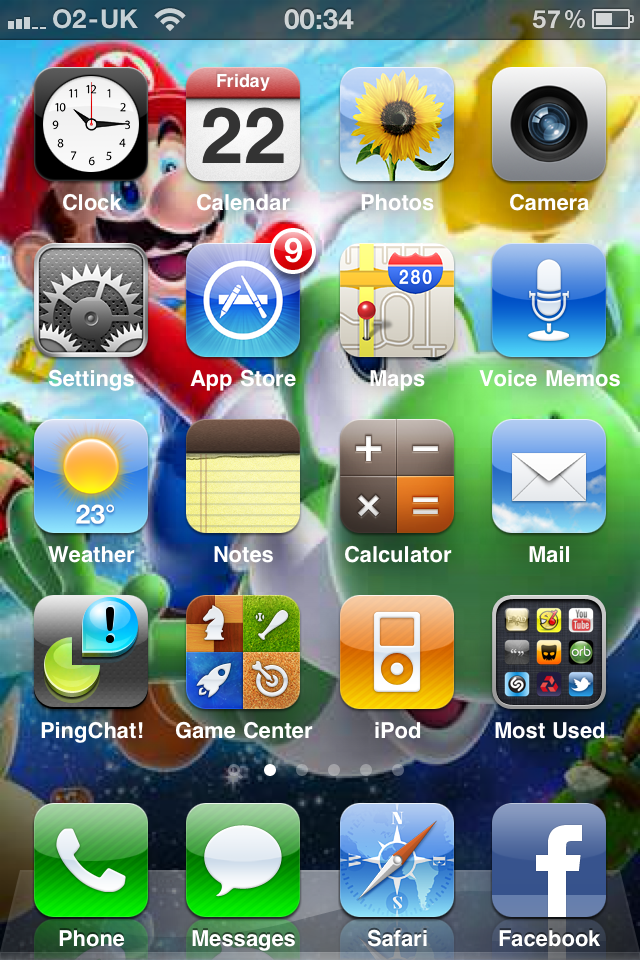 |
One of the first things I do before I make the plush is figure out everything I can and cannot do with sewing. The first thing I noticed is that many of the apps on his phone are very complex with tiny details. With little to no hand embroidery skills I knew some of those details would be impossible. I also knew cutting fabric shapes that small would be risky and messy. With those thoughts in mind I decided I could really only do about 12 of the apps. And so I started constructing a paper model of what I wanted. The paper model is such a helpful tool for me with detailed work. It allows me to measure out everything, and visualize the plush before I even make it. It also helps me determine how much fabric I will need and give consistency in my plushies should I make this plush again in the future.

With my paper outline ready I start cutting out fabric. I use the little square piece to cut out the apps so they all end up roughly the same shape. I always try my best to cut shapes the same, but sometimes they just don't come out that way. So I always start big and leave room for me to trim if I need to adjust the shape at all. I also keep a giant scrap bin of small pieces of fabric for occasions like this where i need very small pieces of fabric. it allows me to waste less fabric :D
With everything cut I like to lay it all out to see how it will all look. Notice how I marked the black fabric to give me guidelines of where everything should go. These little marks help keep everything in the right position.


They look really good so far and I'm feeling happy with the way it is going. So as you can see in the pictures, the plushes have lots of floating pieces. My next move is to connect those peices to complete the apps. This is one of those things I've learned through sewing. You always do all these little details before you sew the big piece that they go on. It makes everything so much easier.

I added as many details as I felt comfortable with. My personal favorite is the clock and the notepad. ^_^
This has been fun, if you have any questions feel free to comment. I hope to finish this up soon and share the rest next time I blog :D
Monday, July 4, 2011
New Blog
Sorta new to this blogging about crafts and plushies thing. I'm hoping that this blog can be a way for me to show off my new plushies as well as share some tips and show you some glimpses inside my mind on how these little guys come to creation. In addition to that it may be cool to occasionally feature other plush makers and have giveaways. For now I'd just like to share my newest little guy, Mr Fuzzy Slug.
I actually really hate slugs they kinda gross me out cause they're so slimy(no offense to any slug lovers out there). But one of the many goals I have when I make any of my Cute Stuffies is to make anything and everything cute. And so this was my attempt at making a slug cute and I'm really happy with the outcome ^_^
I actually really hate slugs they kinda gross me out cause they're so slimy(no offense to any slug lovers out there). But one of the many goals I have when I make any of my Cute Stuffies is to make anything and everything cute. And so this was my attempt at making a slug cute and I'm really happy with the outcome ^_^
Subscribe to:
Posts (Atom)